
Collector guide
How to Clean DVDs Without Damaging Them
A careful, practical method for cleaning DVD fingerprints and dust, checking playback, and avoiding the mistakes that can make a disc worse.

A DVD that skips, stalls, or refuses to load does not always need a dramatic fix. Often, the useful first step is much quieter: look closely, remove any visible dust or fingerprints, and test the disc again. The key is to clean only when the disc needs it and to do it in a way that does not create a new scratch while you are trying to solve an old problem.
This guide is for ordinary home care of commercially pressed movie DVDs. It will help with light dust, fingerprints, and residue. It will not turn a deeply scratched, cracked, warped, or failing disc into a perfect copy. For a rare or out-of-print film, that distinction matters. Gentle care can keep a good disc playable. Aggressive home fixes can leave you with less to work with.
Start by deciding whether the DVD needs cleaning
Do not clean every disc just because it has been sitting on the shelf. The preservation guidance from the Council on Library and Information Resources makes a sensible point for home collectors too: clean a disc when there is visible surface contamination or a real playback reason to investigate it. Routine rubbing gives dust and grit more chances to drag across the reading surface.
Take the disc out by the outer edge and the center hole, then angle the playing side toward a soft light. Look for fingerprints, dust, dried spots, cloudy residue, or a mark that was not there before. Check the center hub as well. A crack near the middle is not a cleaning job, and a loose or broken case hub can damage a disc simply by letting it rattle around.
If a DVD is clean but still acts up, do not immediately assume the disc is finished. Try another known-good DVD in the same player. Then try the troubled disc in another compatible player if you have one. A dirty or aging player can produce a symptom that looks like a disc problem. The goal is to learn what needs attention before you start touching the disc surface.

Set up a safe place to work
Choose a clean, stable surface with enough room for the open case, the cloth, and the DVD. A bare table is fine when it has just been cleared and wiped down. A crowded desk is not. You should be able to pick up the disc without brushing it against a stack of cases, a loose remote, or whatever else happens to be waiting nearby.
Keep the case open beside you so the DVD has a protected place to go as soon as you finish. Do not leave the playing side face down on the table while you reach for another cloth or answer a message. That short pause is where an otherwise careful cleaning job can turn into a new fingerprint, a fresh piece of grit, or a shallow scuff.
Good light helps too. You are not trying to inspect every tiny hairline mark under a magnifier. You simply need enough light to tell whether there is a real fingerprint or residue worth removing, and whether the cloth has lifted it. Natural daylight or a nearby lamp is usually enough. Avoid working in direct sun, where glare can make an ordinary reflection look more serious than it is.
What to use, and what to leave out
For most light cleaning, you need one thing: a clean, soft, lint-free cloth. Keep a dedicated cloth with your media supplies so it is not carrying grit from a kitchen counter, a phone screen, or a dusty shelf. A cloth that feels soft but has a grain of debris trapped in it is not gentle once it meets a reflective disc.
The National Archives’ optical-media guidance recommends a dry, lint-free soft cloth for fingerprints and similar deposits. If the residue still will not lift, it allows a small amount of distilled or deionized water. Put that water on the cloth, not directly on the DVD. You want control over the moisture, not a wet disc or liquid near the center hub.
Leave out the improvised cures. A DVD is not a countertop and it is not a car headlight. Toothpaste, abrasive pads, scouring powders, and strong household cleaners are all wrong for a disc you hope to keep. Even when a trick seems to help for one playback, it can hide the fact that the surface has been altered. A scarce movie is worth more than a quick experiment.
Also skip paper towels, tissues, and the corner of a shirt. They are convenient, but they can be rough or carry particles you cannot see. If you do not have a proper cloth, wait until you do. A fingerprint is usually less urgent than a careless wipe.
How to clean a DVD, step by step
1. Wash and dry your hands. Start with clean, dry hands and a clean work surface. Keep food, drinks, and loose clutter away. This sounds fussy until a drop of coffee lands near a favorite disc, then it becomes obvious why the quiet setup matters.
2. Hold the DVD by the edge and center hole. Avoid placing a thumb on the playing surface. Using the edge and the center opening keeps your fingers away from the area most likely to collect new residue or pick up pressure marks.
3. Remove loose dust gently. Do not grind dust into the surface with a hard rub. Use the cloth lightly and let it collect the loose material. If you can see grit, stop and make sure the cloth itself is clean before continuing.
4. Wipe in straight lines from the center out. Begin near the center hole and move straight toward the outer edge. Lift the cloth, rotate the disc slightly, and repeat in another straight path. Do not make a circular polishing motion around the disc. The National Archives notes that circular scratches are more damaging because they can interfere with the way the player reads the data.
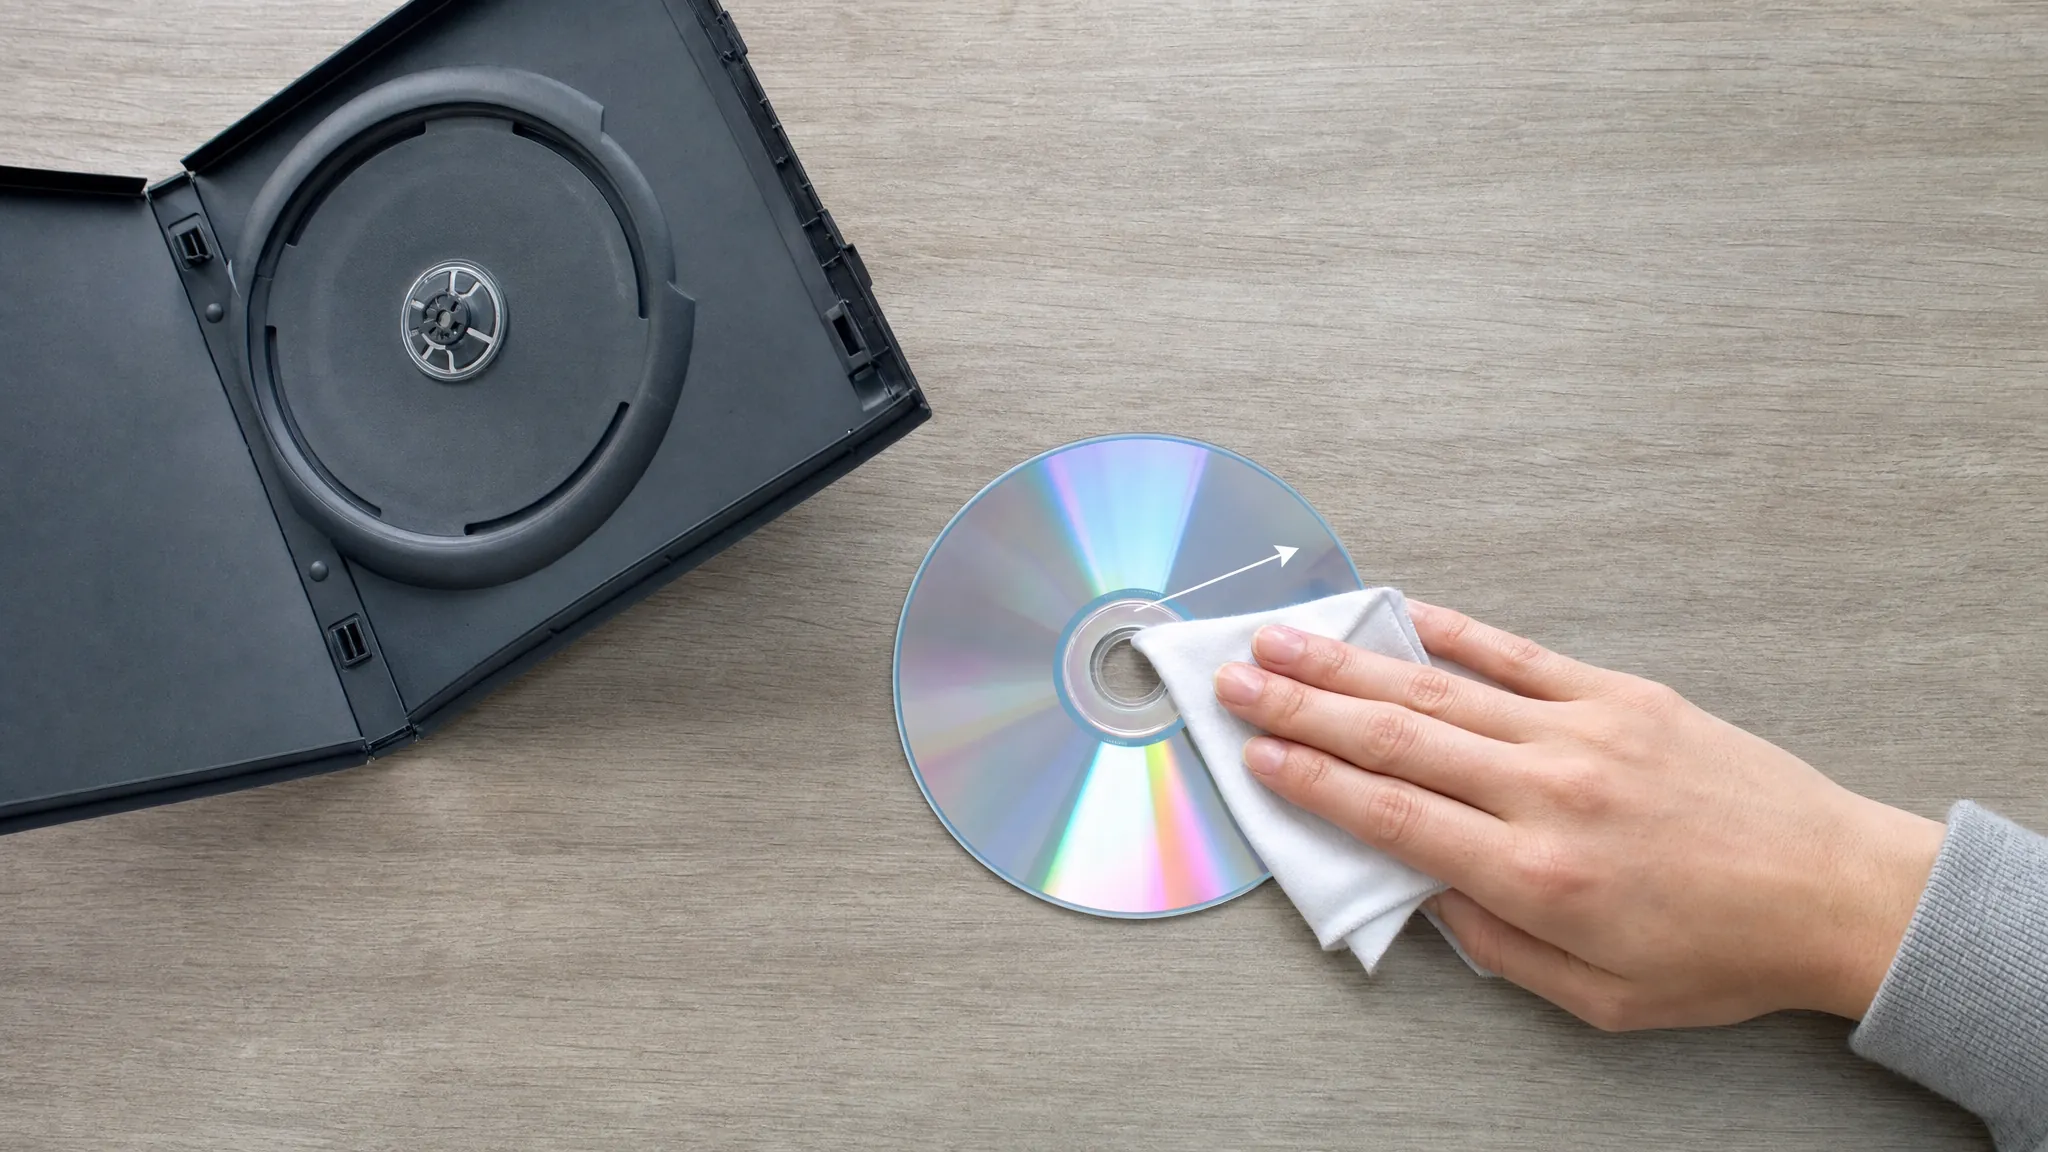
5. Use a little distilled water only when necessary. If a dry cloth does not shift a visible fingerprint or residue, lightly dampen a corner of the cloth with distilled or deionized water. Wipe outward once, then use a dry part of the cloth to remove the remaining moisture. Do not soak the disc, spray it, or put it back in the case while it is still damp.
6. Let the DVD dry completely. Give it a minute in a clean, safe place. Once it is fully dry, return it to the case or test it in the player. Do not set the playing side directly onto a dusty table while it dries. The point of cleaning is to reduce contact with debris, not to trade one source of residue for another.
Why the direction of the wipe matters
A DVD is read along a circular path, so damage that follows that same path can be harder for the player to work around. That is why the outward motion is not just a collector superstition. Marks that run from the center toward the edge cross less of the reading path than a long circular mark.
This does not mean a radial wipe makes a disc invincible. A gritty cloth, heavy pressure, or a damaged disc can still cause trouble. It simply gives you the safest practical pattern when you need to remove residue. Think of it as minimizing the risk, not as performing a repair.
It also explains why “polishing” can be misleading. The shiny surface may look better after a vigorous circular rub, but looks are not the same as readability. A collector cares about whether the disc plays cleanly through the film, not whether it has been buffed into a brighter reflection.
When cleaning will not solve the problem
Cleaning helps when dust, fingerprints, or residue are blocking a clear read. It cannot correct every kind of damage. Deep scratches, cracks near the hub, warped discs, peeling layers, and persistent playback failures are different problems. The National Archives is direct about deep scratches: there is no ordinary maintenance procedure that can correct damage serious enough to affect readability.
If a disc still skips after a gentle clean, note where it fails. Does it freeze at the same chapter? Does the menu load but the movie stop later? Does it work in a second player? Those answers matter more than trying three more substances. A repeatable failure point is useful information when you decide whether to find another copy.
Be extra cautious with a rare release, a favorite box set, or an edition with a cut or bonus material you cannot easily replace. Check the listing details before buying another copy. The used-DVD buying checklist can help you compare condition, edition, disc count, and the actual item before you pay for a replacement.
Test once, then stop experimenting
After the disc is dry, play the part that was giving you trouble. If it now loads and plays normally, return it to its case and leave it alone. Re-cleaning a disc that is already working does not make it safer. It only adds more handling and more opportunity for an avoidable mark.
If the problem remains, test with purpose. Use a second compatible player when possible, and note whether the failure happens at the same menu, chapter, or time in the movie. That simple note helps you decide whether you are looking at a disc issue, a player issue, or a compatibility problem. It is more useful than repeating the cleaning process with stronger products or heavier pressure.
For a common title, a clean replacement may be the sensible answer. For a scarce disc, protect the copy you have, keep the original packaging and inserts together, and compare replacement listings carefully. A physical-media collection is easier to maintain when every purchase and every care decision respects the exact edition you wanted in the first place.
Keep clean DVDs clean between movie nights
The easiest cleaning job is the one you prevent. Return each DVD to its case after watching it and make sure the center hub holds it securely. Store cases upright on a stable shelf, away from direct sun, heat vents, damp basements, and places where a stack can slide or get crushed.
A modest shelf routine goes a long way. If a case is cracked or the hub no longer grips, replace the case before the disc starts moving around loose. When you take a title out, touch the edge and center hole from the beginning. The habits are small, but they are especially valuable for movies that are out of print or hard to locate again.

The site’s DVD care guide goes deeper on storage, inspection, and playback warning signs. For the bigger picture of choosing what belongs on the shelf, the physical media collection guide can help you keep a simple record of the editions you value most.
Keep the copy you chose ready to play
Cleaning a DVD should be simple: inspect it, use a clean lint-free cloth, wipe straight from the center outward, use a little distilled water only when the residue calls for it, and let the disc dry before it goes back in the case. That is enough for ordinary fingerprints and dust. Anything more forceful should make you pause.
Retro and Classic Flixs is built for collectors who care about the specific copy, not just the title on the cover. When a favorite needs replacing or a shelf has a real gap, use title search, browse the current DVD selection, or explore the pages for rare DVDs, out-of-print editions, and hard-to-find titles. The right disc is one you understand, can play, and will be glad to pull down for the next movie night.
Frequently asked questions
DVD cleaning, answered
What is the safest way to clean a DVD?
Start only when you can see dust, fingerprints, or residue. Hold the disc by the edge and center hole, then wipe it gently with a clean, dry, soft lint-free cloth in straight lines from the center outward. Let it dry fully before returning it to the case or trying playback.
Can I use water to clean a DVD?
If a dry lint-free cloth does not remove visible residue, use only a small amount of distilled or deionized water on the cloth, not directly on the disc. Wipe from the center outward, then allow the DVD to dry completely before playing or storing it.
Why should I not wipe a DVD in circles?
Circular scratches can follow the path a player uses to read the disc and are more likely to interfere with playback. A straight wipe from the center hole toward the outer edge is less likely to create that kind of damage.
Can cleaning fix a scratched DVD?
Cleaning can remove dust or residue that affects playback, but it cannot reliably repair a deep scratch, crack, or damaged center hub. Inspect the disc, test it in a known-good compatible player, and look for a replacement if a valuable title still will not play.
Keep exploring
More collector guides.
Collector guide
Physical Media Collection: How to Build One That Lasts
A practical starting point for choosing, cataloging, organizing, storing, and enjoying a movie collection you will actually use.
Read guide →
Collector guide
Physical Media vs Streaming: A Collector’s Guide
A clear comparison of convenience, ownership, editions, cost, and care for viewers deciding what belongs on the shelf.
Read guide →
Collector guide
What Is Physical Media? DVDs, Blu-rays, 4K & More
Physical media means DVDs, Blu-rays, 4K discs, VHS, and other formats you own. Learn the types, why editions matter, and what to check.
Read guide →Ready for the hunt?